Securing a Vue.js app and API with IdentityServer - Part 2
This is part 2 of a series showing you how to secure a Vue.js app with IdentityServer and call an ASP.NET Core Web API.
- Part 1 - Overview and Solution Structure
- Part 2 - Creating and Configuring your IdentityServer (this post)
- Part 3 - Adding Google Authentication to IdentityServer
- Part 4 - Creating and securing an ASP.NET Core Web API
- Part 5 - Creating the Vue.js client
- Part 6 - Calling an HTTP API from Vue.js
- Part 7 - Securing a router view in Vue.js
- Part 8 - Calling a secured API from Vue.js
- Part 9 - Refreshing identity tokens with Vue.js
Note: You can find the source code for this post series on GitHub.
Creating and configuring your Identity Server
IdentityServer is an open-source OpenID Connect and OAuth 2 framework. It’s not an out-of-the-box solution. It means it’s highly flexible, but that it also requires some extra effort from us to get it working.
Thankfully, the IdentityServer team has provided some immensely useful Quickstart templates to help people like you and me to get up and running quickly. Handy!
Start by cloning the repository at https://github.com/IdentityServer/IdentityServer4.Samples and then copy the QuickstartIdentityServer folder from Quickstarts/7_JavaScriptClient/src/QuickstartIdentityServer/ into your solution root.
In Visual Studio, add an existing project to your solution and reference the Quickstart folder you just created.
The IdentityServer Quickstart projects will listen on port 5000 using HTTP, not HTTPS, by default. Port 5000 will clash with the port we’re using for our web API application and we want secured communications so we need to adjust some properties.
In the project properties page, change the Debug profile to use HTTPS on a different port number. Personally, I prefer to use Kestrel for local development and I don’t like the browser being auto-launched, so I’ve set my properties page as follows:
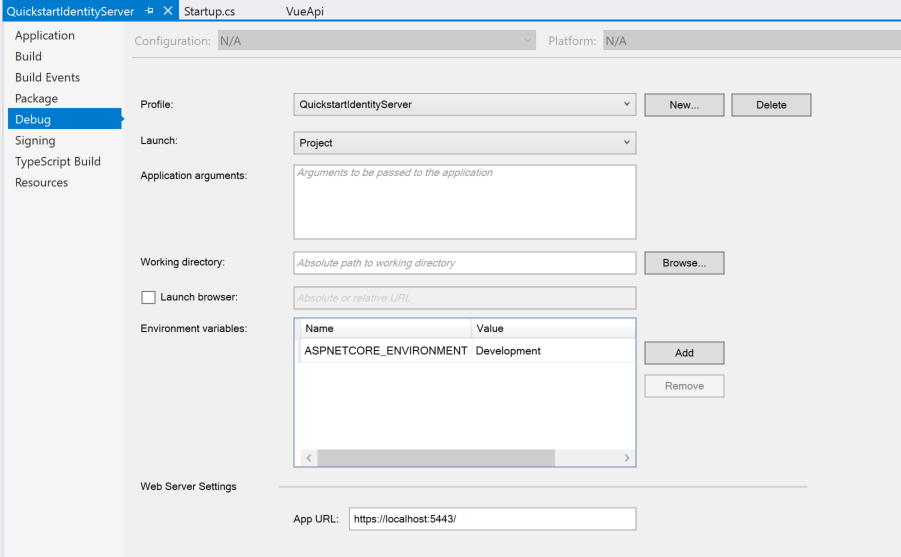
You can adjust your configuration to suit your personal preferences. Just keep in mind that I’ve configured IdentityServer to run on https://localhost:5443.
If, like me, you use Kestrel to run your app then you’ll want to quickly upgrade the Quickstart from .NET Core 2.0 to .NET Core 2.1.
Doing so avoids the need to manually configure HTTPS support. You’ll only need to change the NuGet reference from Microsoft.AspNetCore.All to Microsoft.AspNetCore.App and you’ll be set to continue.
The Quickstart code stores everything in memory and is a long way from being a production-ready identity solution. For the purposes of this blog series, we’re going to leave most of it as-is.
Client Configuration
In IdentityServer “clients” are the client applications connecting that want to connect to a secured resource. Our Vue.js application will be one of those clients applications and will use the Implicit grant flow to authenticate.
Firstly, find the Quickstart’s JavaScript client configuration in Config.cs (you should see it at line 88).
Recall that our web application is going to be running on port 5000? When IdentityServer authenticates a person it will make a callback request to the client to complete the sign in process.
We need to tell IdentityServer the URI of this callback endpoint. We’ll also adjust the ClientName so that the sign-in process looks a little nicer in the UI.
// JavaScript Client
new Client
{
    ClientId = "js",
    ClientName = "VueApi JavaScript Client",
    AllowedGrantTypes = GrantTypes.Implicit,
    AllowAccessTokensViaBrowser = true,

    RedirectUris = { "https://localhost:5000/callback" },
    PostLogoutRedirectUris = { "https://localhost:5000/" },
    AllowedCorsOrigins = { "https://localhost:5000" },

    AllowedScopes =
    {
        IdentityServerConstants.StandardScopes.OpenId,
        IdentityServerConstants.StandardScopes.Profile,
        "api1"
    },
}
The Redirect URI will be a route we create (later) in our Vue.js app and is where we’ll handle the IdentityServer callback.
P.S. In case you missed it, we also changed from http:// to https:// in the URIs other URIs on the page.
Check your code compiles and that your IdentityServer starts. You won’t be able to do too much just yet, but you should be able to log in using the preconfigured users Bob and Alice, each with a password of Password.
One final note; I prefer using dotnet watch run from the specific project folders (not the solution root) to run both the IdentityServer and API applications. If you prefer running from Visual Studio, don’t forget to change the startup project or to manually start the specific projects as we go through the series.
Up Next: Part 3 - Adding Google Authentication to IdentityServer